When the holiday season calls for sweet treats without turning on the oven, nothing hits the spot quite like a chilled peppermint slice. this no-bake delight combines the refreshing zing of peppermint with a luscious, creamy base and a crunchy biscuit crust-creating a festive dessert thatS as easy to make as it is irresistible. Whether you’re a seasoned baker looking for a quick fix or a kitchen novice eager to whip up some holiday magic, this peppermint slice recipe promises a simple, cool, and minty indulgence perfect for sharing (or savoring solo) any time of year. Let’s unwrap the secrets to crafting this chilled confection that’s bursting with yuletide cheer!
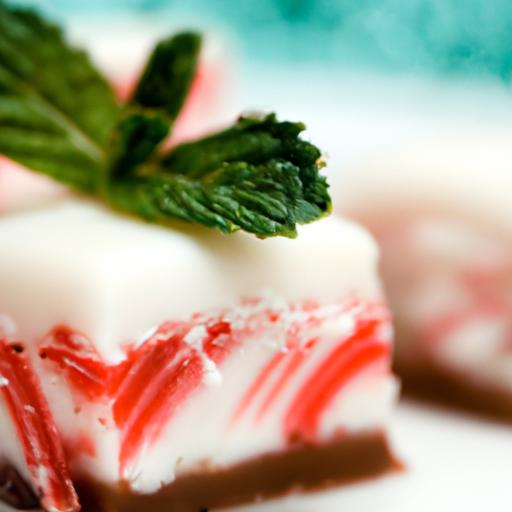
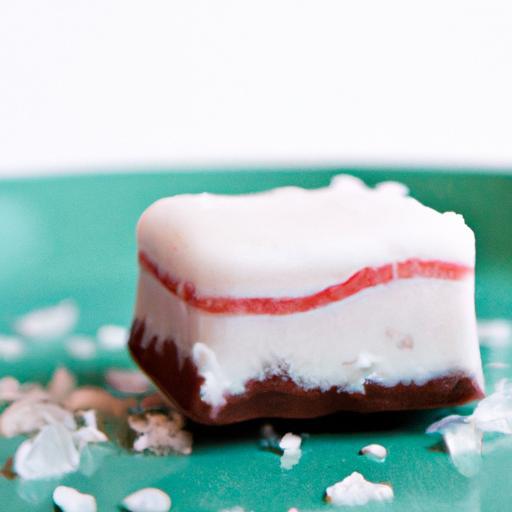
Chilled Delight imbues every bite with a cool burst of peppermint that instantly refreshes the palate, making it the quintessential treat for festive occasions or an indulgent anytime snack. this no-bake peppermint slice harmonizes crunchy textures with a silky peppermint-infused custard layer, finished off by a glossy chocolate topping that sparkles with festive charm.Inspired by traditional Australasia slice recipes, this chilled delight elevates simple ingredients into a striking treat that’s as delightful to look at as it is indeed to savor.
Prep and Cook Time
- Preparation: 20 minutes
- Setting Time: 4 hours (preferably overnight)
yield
Serves 12 generous slices
Difficulty Level
Easy – Perfect for home bakers and holiday entertainers alike
Ingredients
- Base Layer:
- 2 cups crushed chocolate biscuits (such as digestive or graham crackers)
- 1 cup desiccated coconut
- ¾ cup sweetened condensed milk
- 1 tablespoon cocoa powder, sifted
- Minty Middle Layer:
- 1 packet (85g) mint-flavored jelly crystals
- 1 cup boiling water
- ½ cup cold water
- 1 teaspoon peppermint extract
- 200g cream cheese, softened
- 2 tablespoons icing sugar, sifted
- Chocolate Topping:
- 150g dark chocolate, chopped
- 2 tablespoons coconut oil (for shine and smoothness)
- Crushed candy canes or peppermint pieces, for garnish
Instructions
- prepare the no-bake base: In a large bowl, combine crushed chocolate biscuits, desiccated coconut, cocoa powder, and sweetened condensed milk. Mix until everything binds together in a sticky mixture. press evenly into the base of a 20x20cm square tin lined with baking paper, ensuring it’s compacted firmly to create the perfect crunchy foundation.
- Set the mint jelly: dissolve the mint-flavored jelly crystals in 1 cup of boiling water. Stir well to fully dissolve, then add cold water. Let the jelly cool slightly until it begins to thicken but is not yet set.
- Combine mint cream layer: In a separate bowl, beat the softened cream cheese and icing sugar until smooth and fluffy. Gently fold in the slightly thickened jelly along with peppermint extract, taking care not to deflate the mixture. pour this over the biscuit base evenly, smoothing with a spatula.
- Chill: Place the tin in the refrigerator for at least 3 hours, ideally overnight, to allow the jelly cream layer to fully set and the base to firm up.
- Glaze with chocolate topping: Melt the dark chocolate and coconut oil together in a heatproof bowl over simmering water, stirring until silky smooth. Pour this over the set mint cream layer and gently spread to cover entirely.
- Decorate: Before the chocolate sets, sprinkle crushed candy canes across the top for sparkling festive appeal and an extra peppermint crunch.
- Final chill: Return the slice to the fridge for at least 1 hour to allow the chocolate topping to set firmly.
- Serve: Cut into neat squares using a sharp knife dipped in hot water for clean edges. Serve chilled for ultimate refreshment.
Tips for Success
- Crush biscuits finely but leave some chunky pieces for added texture in the base.
- Softening cream cheese at room temperature makes folding in the jelly smoother and prevents lumps.
- Use fresh peppermint extract for the brightest mint flavor; adjust to taste but avoid overpowering.
- For a dairy-free version, substitute cream cheese with coconut cream and use vegan chocolate.
- To keep your peppermint slice fresh and festive, store refrigerated in an airtight container for up to 4 days.
- Freeze leftover slices individually wrapped for up to 3 weeks and thaw in the fridge before serving.
- clean-cut slices by wiping your knife blade between each slice with warm water – this prevents cracking or smudges on your glossy chocolate layer.
Serving Suggestions
Serve chilled on a decorative platter sprinkled with extra crushed peppermint bits or edible glitter to enhance the sparkle effect. Pair your chilled peppermint slice with a frothy hot chocolate or a refreshing peppermint tea to elevate the mint pairing. Alternatively,slice smaller pieces to create bite-sized party treats ideal for festive gatherings.

| Nutritional Info (per slice) | Calories | Protein | Carbohydrates | Fat |
|---|---|---|---|---|
| Approximate | 220 kcal | 3 g | 28 g | 12 g |
Looking to explore more no-bake recipes? check out our ultimate no-bake dessert collection for inspiration. For more on peppermint’s benefits and unique flavor profile,visit Healthline’s comprehensive guide.
Q&A
Q&A: Chilled Delight – How to Make No-Bake Peppermint Slice
Q1: what exactly is a no-bake peppermint slice?
A1: Imagine a harmonious blend of rich chocolate, crumbly biscuit base, and refreshing peppermint all rolled into one delightful slice-without ever turning on your oven! No-bake peppermint slice is a chilled dessert that’s as easy to create as it is delicious to devour. Perfect for festive occasions or whenever your sweet tooth calls for something crisp, minty, and chocolaty.
Q2: Why choose a no-bake recipe for peppermint slice?
A2: No-bake recipes are the unsung heroes of the dessert world-quick, fuss-free, and requiring minimal ingredients or equipment. Plus, they keep your kitchen cool and save you from heating up your oven during warmer months.This peppermint slice lets you skip the baking but still enjoy a beautifully set treat that slices cleanly and melts your heart.
Q3: What are the key ingredients needed for this peppermint slice?
A3: The magic stems from a buttery biscuit base (frequently enough made with crushed cookies or digestive biscuits), a luscious peppermint-infused white chocolate layer, and a glossy dark chocolate topping.Fresh peppermint extract or finely crushed candy canes add that unmistakable minty zing, while butter and sweetened condensed milk bring everything together with a silky richness.Q4: How do you get that perfect mint-chocolate balance?
A4: The secret lies in layering. The base is indulgently chocolatey but not overpowering. The middle layer is where the peppermint shines-white chocolate softened with a hint of cream and brightened with peppermint extract offers a cooling counterpoint. a dark chocolate drizzle or layer on top cuts through the sweetness, adding depth and a bit of bitterness for complexity.
Q5: Can this dessert be modified for dietary preferences?
A5: Absolutely! Swap regular biscuits for gluten-free options, use dairy-free chocolate and coconut condensed milk for a vegan-friendly twist, or reduce sugar by choosing sugar-free peppermint extract and chocolates. This no-bake peppermint slice is wonderfully adaptable without losing its signature charm.
Q6: How long does it take to set, and what’s the best way to serve it?
A6: Patience is key-the slice typically needs around 2 to 4 hours in the fridge to firm up nicely. Once chilled, let it sit at room temperature for a few minutes before slicing to ensure clean cuts. Serve on a decorative platter, garnish with candy cane bits or fresh mint leaves, and watch your guests’ eyes light up with every bite.
Q7: Any pro tips for making the perfect no-bake peppermint slice?
A7: Use finely crushed biscuits for a more cohesive base, and press them firmly to avoid crumbling. When melting chocolate, do it gently-preferably over a double boiler-to prevent burning. Lastly, layer steadily and chill between additions if possible; this prevents mixing and results in crisp, defined layers.
Ready to whip up your own chilled peppermint delight? With no oven required and flavor guaranteed, this no-bake peppermint slice is your next show-stopping dessert!
Insights and Conclusions
As the cool, minty layers of your no-bake peppermint slice come together, you’re not just creating a dessert-you’re crafting a moment of refreshing indulgence that requires no oven and minimal fuss. Whether it’s a festive treat or a spontaneous craving, this chilled delight proves that simplicity and flavor can coexist beautifully. So next time you need a quick,crowd-pleasing dessert that delivers on both texture and taste,remember this recipe-and savor the effortless joy of peppermint magic,one slice at a time.