There’s something mesmerizing about a chocolate mirror glaze-its glossy, glass-like surface reflecting light wiht a hypnotic shimmer, transforming any dessert into a showstopper. “shiny Delight: Mastering the ultimate Chocolate Mirror Glaze” invites you into the art and science behind this stunning technique,where taste meets visual poetry. From perfectly balancing ingredients to achieving that flawless,reflective finish,this guide unravels the secrets that elevate a simple cake into an edible masterpiece. Whether your a seasoned pastry chef or an adventurous home baker, get ready to dive into the magic of chocolate glaze that gleams as brilliantly as it delights the palate.
Understanding the Science Behind a Perfectly Glossy Mirror Glaze
Shiny Delight begins with a magical balance of texture and temperature that transforms simple ingredients into an irresistibly glossy chocolate mirror glaze. The secret lies in the interplay of gelatin, cocoa solids, and sugar-each ingredient harmonizing to create that flawless liquid sheen that sets like glass. Gelatin stabilizes and firms the glaze, allowing it to coat your cake smoothly without dulling. simultaneously occurring, the right proportion of glucose or corn syrup controls crystallization, preventing premature graininess and maintaining that signature shine. Temperature control is key: pouring the glaze too hot melts the underlying cake, while too cool leads to uneven coverage and dull finish. Understanding this dance of chemistry empowers you to master a mirror glaze that’s as visually stunning as it is indeed indulgently smooth.
Essential Ingredients and Tools for Achieving Flawless Shine
- Gelatin sheets or powdered gelatin: The structural backbone that sets the glaze perfectly.
- Heavy cream: Adds silkiness and richness, smoothing texture.
- Glucose syrup or corn syrup: Prevents crystallization and enhances gloss.
- Granulated sugar: Sweetness and a slight bite to the glaze.
- Cocoa powder (unsweetened): Provides deep chocolate flavor and color.
- Dark chocolate (60-70% cacao), finely chopped: Melts into a glossy, rich base.
- Water: For blooming gelatin and dissolving sugar.
For tools,equip yourself with:
- Digital kitchen scale – precision matters.
- Thermometer - to monitor glaze temperature (ideal pouring temp: 90-95°F/32-35°C).
- Fine mesh sieve – ensures ultra-smooth consistency.
- Heatproof bowls and a sturdy whisk.
- A wire rack with a baking tray beneath to catch excess glaze.
Step-by-Step Techniques to Pour and Set Your Chocolate Mirror Glaze
- Bloom the gelatin: sprinkle gelatin over cold water. Let it absorb and swell for 5-10 minutes.
- Heat sugar, glucose syrup, cocoa powder, and water: In a saucepan, combine and heat gently until sugar dissolves and mixture just begins to simmer.
- Add cream and remove from heat: Stir until fully incorporated, then add bloomed gelatin, whisking until melted and silky smooth.
- Pour over chopped chocolate: Immediately pour the hot mixture over the chocolate in a bowl. Let stand 1-2 minutes to melt,then stir gradually until glossy and lump-free.
- Strain the glaze: Push the mixture through a fine mesh sieve to remove any bits and bubbles for an ultra-smooth finish.
- Cool to the perfect pouring temperature (90-95°F/32-35°C): Stir occasionally to release heat. The glaze should coat the back of a spoon fluidly but not run too thin.
- Set up your cake: Freeze your mousse or entremet overnight. Place cake on a wire rack over a tray to capture drips.
- Pour generously: In one steady motion, pour the glaze over the center top, allowing it to cascade down evenly. Avoid touching the sides for a smooth finish.
- Let glaze set briefly: Stand at room temperature for about 10 minutes until the glaze firms up to a mirror-like surface.
troubleshooting Common Issues and Expert Tips for Lasting Reflection
Patience and precision make the difference between a dull finish and a Shiny Delight that looks professionally crafted. Here are frequent issues and how to fix them:
- Glaze too runny: Your temperature is too high, or gelatin quantity may be low. Slightly increase gelatin next time or let glaze cool longer before pouring.
- Grainy or dull glaze: Undissolved sugar or rapid cooling can cause crystallization. Always strain your glaze and pour at correct temperature.
- Glaze sliding off cake: The cake surface may be too warm or not frozen well enough. Freeze your cake solid and pour glaze promptly.
- Air bubbles in glaze: Stir glaze gently to avoid trapping air, let stand before pouring, and tap the bowl lightly to release bubbles.
For a lasting mirror shine, store the finished cake in a cool place and avoid refrigeration with humidity fluctuations, which can fog or dull the glaze.
Prep and cook Time
- Prep Time: 20 minutes
- Cook Time: 10 minutes
- Cooling & Setting Time: 1 hour (plus overnight freezing of cake)
Yield
- Glaze quantity: Enough to coat a 8-inch (20 cm) round cake (approximately 500 g glaze)
- Servings: 8-10 slices
Difficulty Level
Medium – Advanced
Ingredients
- 12 g gelatin sheets or 4 tsp powdered gelatin
- 150 ml cold water (for gelatin bloom)
- 200 g granulated sugar
- 200 ml water (for syrup)
- 100 g glucose syrup (or corn syrup as substitute)
- 150 ml heavy cream (35% fat), room temperature
- 30 g unsweetened cocoa powder
- 200 g dark chocolate (60-70% cacao), finely chopped
Instructions
- Bloom your gelatin: Submerge gelatin sheets in 150 ml cold water or sprinkle powdered gelatin over water.Let swell 10 minutes.
- Create syrup base: In a medium saucepan, combine 200 g sugar, 200 ml water, 100 g glucose syrup, and 30 g cocoa powder. Heat gently, whisking constantly until sugar dissolves and mixture starts simmering.
- add cream: remove from heat, stir in 150 ml cream.
- Incorporate gelatin: Squeeze excess water from gelatin sheets or add powdered gelatin with bloomed water, whisk until fully dissolved.
- Pour over chopped chocolate: Immediately pour hot mixture over chocolate. Let sit 2 minutes,then whisk gently until smooth and shiny.
- Strain glaze: Pass mixture through fine sieve into a clean bowl to remove lumps and air bubbles.
- Cool glaze: Let cool to 90-95°F (32-35°C), stirring occasionally.
- Prepare cake: Ensure frozen cake is on wire rack over a tray.
- Pour glaze: Starting from center, pour in one steady flow.Use spatula to catch excess drips if needed.
- Set and serve: Allow glaze to set 10-15 minutes at room temperature before transferring cake to serving plate.
Chef’s Notes
- Flavor Boost: Infuse syrup with a vanilla bean or orange zest for extra complexity.
- Substitutions: Agar-agar is not recommended as a gelatin substitute for mirror glaze due to texture differences.
- Make Ahead: Prepare glaze up to 24 hours in advance and store covered in refrigerator.Warm gently before use.
- Texture Tip: For an extra smooth application, use a handheld blender briefly after melting chocolate but before straining.
- Cleaning: Use warm water to wipe spatulas immediately after use to prevent chocolate hardening.
Serving Suggestions
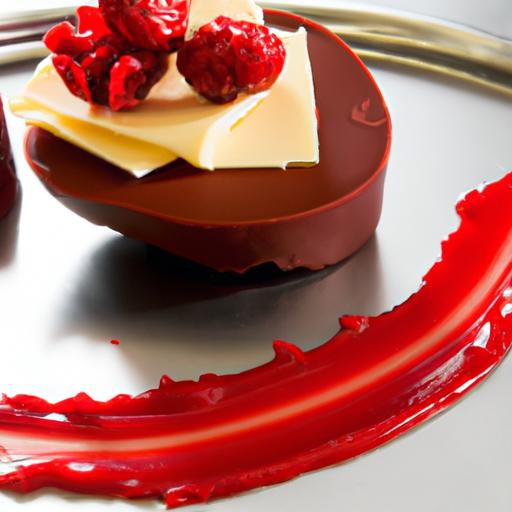
Present your shiny Delight chocolate mirror glaze on a minimalist white or black cake stand to highlight the striking gloss. Garnish with delicate gold leaf flakes, fresh edible flowers, or a dusting of cocoa powder at the base for contrast. Pair with whipped cream or vanilla bean ice cream to elevate the chocolate’s rich profile. For added texture, serve alongside crisp nuts or a raspberry coulis drizzle, enhancing both color and flavor harmony.

| Nutrient | per Serving (1 slice) |
|---|---|
| Calories | 320 kcal |
| Protein | 4 g |
| Carbohydrates | 35 g |
| Fat | 18 g |
To dive deeper into dessert finishing techniques, check out our Ultimate Chocolate decorating Techniques. For scientific insights on gelatin properties in dessert making, visit ScienceDirect: Gelatin in Food.
Q&A
Q&A: Shiny Delight – Mastering the Ultimate Chocolate Mirror glaze
Q1: What exactly is a chocolate mirror glaze?
A: Imagine a glossy, glass-like finish that wraps your cake in a luxurious chocolatey shine-this is the chocolate mirror glaze. It’s a smooth, reflective coating that not only enhances the visual appeal of desserts but also adds a luscious layer of silky chocolate flavor. Think of it as edible elegance, turning humble cakes into stunning showstoppers.
Q2: What makes mastering the chocolate mirror glaze so special?
A: Mastering this glaze is like capturing liquid magic. it requires a balance of art and science-precise temperatures, the right ratios, and perfect timing. When done right, it creates an immaculate, flawless surface that gleams under the light. The challenge and reward lie in achieving that smooth, mirror-like finish without bubbles, drips, or dull spots.
Q3: What are the key ingredients in a chocolate mirror glaze?
A: The magic trio usually includes chocolate, sweetened condensed milk, and gelatin. Chocolate provides the rich flavor and color, condensed milk adds sweetness and creaminess, while gelatin gives the glaze its signature jiggly, glassy texture. Additional sugar and water create the glossy syrup that brings everything together.
Q4: How important is temperature control during the process?
A: Temperature is the secret conductor to this glossy symphony. Too hot, and the gelatin loses its power; too cool, and the glaze thickens prematurely, making it hard to pour smoothly. Typically, the ideal pouring temperature is around 90°F (32°C), where the glaze is fluid yet firm enough to coat perfectly without melting your cake.
Q5: can I customize the flavor or color of my chocolate mirror glaze?
A: Absolutely! While classic dark or milk chocolate offers that deep, luscious taste, you can infuse your glaze with hints of espresso, chili, or even orange zest for a twist. Coloring is a bit trickier with chocolate, but white chocolate bases can be tinted with food-safe gels or powders for vibrant effects. Creativity is your only limit.
Q6: Are there common mistakes to watch out for?
A: the usual culprits include air bubbles, uneven pouring, or using a glaze that’s too thick or thin. Make sure to strain the glaze before pouring to eliminate lumps and bubbles. Pour the glaze in one smooth motion over a frozen cake for the best coverage, and always keep your cake cold so the glaze sets instantly without soaking in.
Q7: How do I properly prepare my cake before glazing?
A: A flawless mirror glaze needs a flawless canvas. The cake should be smooth and chilled, often layered with a crumb coat of mousse or buttercream and then frozen solid. This cold foundation helps the warm glaze set quickly, creating that signature shiny, reflective surface without melting or sliding off.
Q8: What’s the best way to serve and store a mirror-glazed cake?
A: Serve your masterpiece at room temperature for the perfect balance of flavor and texture. Store it in the fridge, covered loosely with a dome or plastic wrap to preserve that shine for up to 2-3 days. Avoid airtight containers that might trap condensation and dull the glaze’s mirror finish.
Q9: Is a mirror glaze suitable for beginners?
A: While it might seem intimidating, with patience and practice, even beginners can achieve stunning results. Start with simple recipes, follow instructions meticulously, and don’t get discouraged if your first try isn’t flawless. Each attempt sharpens your intuition for that perfect shiny delight.
Q10: Why is chocolate mirror glaze considered the “ultimate” glaze?
A: As it combines the sensual appeal of chocolate with a visual extravaganza-the ultimate pleasure for both eyes and palate.It’s a testament to culinary finesse,transforming desserts into edible art that dazzles at every party. Onc you master this glaze, you hold the key to elevating your baking to breathtaking heights.
Final Thoughts
As you perfect the art of the chocolate mirror glaze, remember that each pour is more than just a step-it’s a moment of magic, transforming humble ingredients into a glossy masterpiece. With patience, precision, and a touch of creativity, your shiny delight will not only captivate the eyes but also elevate every bite to an unforgettable experience. So go ahead, embrace the mirror’s gleam, and let your desserts shine like edible works of art. Your journey to mastering the ultimate chocolate mirror glaze has just begun-reflect brilliance, one glaze at a time.